How to Get GST Number: Step-by-Step Online Process (2026)
Reviewed by FCS Yogesh Kumar
Table of Contents
To get a GST number, you apply online on the official GST portal (gst.gov.in) using Form GST REG-01. You verify your PAN, mobile number and email, fill in your business details, complete Aadhaar authentication, and sign the application. Once the tax officer approves it, you receive a 15-character GSTIN and a GST registration certificate. The government charges no fee for this registration. If you would rather have a professional handle the application, you can use Cotaxo’s GST registration service.
This guide explains how to get a GST number step by step, the documents you need as an individual and as a business, and how many days it takes, including the time after you receive your ARN.
What Is a GST Number?
A GST number, formally called the GSTIN (Goods and Services Tax Identification Number), is a unique 15-character code allotted to every registered taxpayer. It is built from your state code (two digits), your PAN (ten characters), an entity number, the letter Z and a check digit.
You need a GST number if your annual turnover crosses the registration threshold. In most states that is ₹40 lakh for goods and ₹20 lakh for services, and the limits are lower in some special category states. Registration is compulsory regardless of turnover in certain cases, such as inter-state supply of goods, selling through e-commerce platforms (subject to the exemptions the law allows), casual taxable persons and non-resident taxable persons. Smaller businesses can choose voluntary registration, which lets them charge GST and claim input tax credit.
How to Get GST Number Online: Step by Step
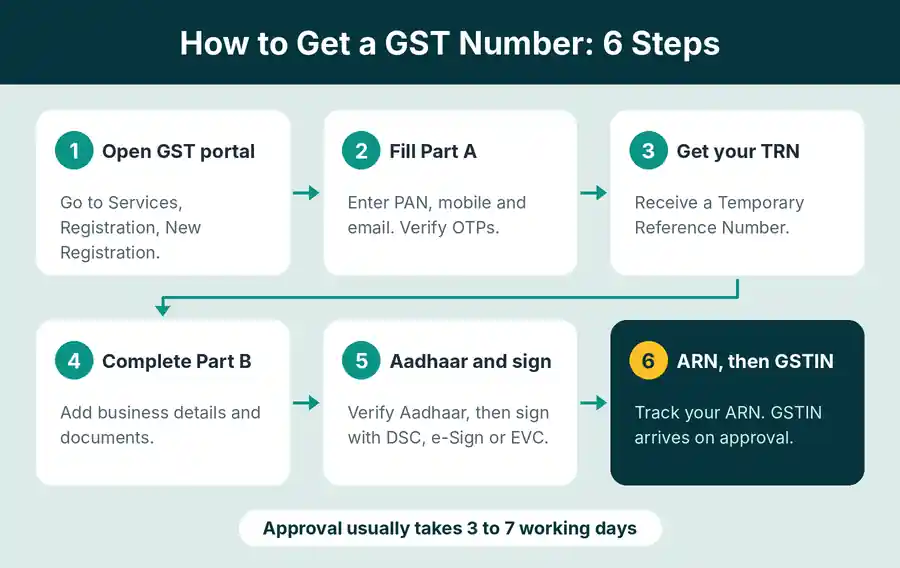
Open the GST portal. Go to gst.gov.in and select Services, then Registration, then New Registration.
Fill Part A. Choose “Taxpayer” as the type, select your state and district, and enter the legal name exactly as it appears on your PAN, your PAN, and the email address and mobile number of the primary authorised signatory. PAN is mandatory.
Verify the OTPs. You receive two separate OTPs, one on your mobile and one on your email. Each is valid for 10 minutes.
Note your TRN. The portal generates a Temporary Reference Number (TRN) and sends it by email and SMS. Your saved application is deleted after 15 days if you do not submit it.
Start Part B. Return to New Registration, choose the TRN option, enter your TRN, email and captcha, and verify the fresh OTP. Open your draft from My Saved Applications.
Complete the application tabs. Fill in business details (trade name, constitution of business, reason for registration, and whether you want the composition scheme), promoter or partner details, authorised signatory details, principal place of business with address proof, and the goods and services you supply. For goods you can list up to five HSN codes, and for services up to five SAC codes. Bank details are optional at this stage.
Complete Aadhaar authentication. This is selected by default. Authentication links go to the Aadhaar-linked mobile and email of the relevant persons and stay valid for 15 days. Some applicants are asked to visit a GST Suvidha Kendra for biometric verification.
Sign and submit. Use a Digital Signature Certificate (DSC), Aadhaar-based e-Sign or EVC. Companies and LLPs must use a DSC.
Receive your ARN. The Application Reference Number (ARN) is generated once Aadhaar authentication is complete, and the acknowledgement usually reaches you within about 15 minutes of signing. You can follow progress under Track Application Status.
Download your certificate and check your GSTIN. After approval, the GSTIN and registration certificate appear on the portal. You can confirm the number using Search Taxpayer on the same site. If you did not add a bank account earlier, add it within 30 days of registration or before you file your first GSTR-1, whichever is earlier.
How to Get GST Number for Individual
An individual, such as a sole proprietor, freelancer or service provider, applies in the same way, using the proprietor’s personal PAN. You need:
PAN card of the proprietor
Aadhaar number linked to your mobile (needed for authentication)
A recent passport-size photograph showing only your face (JPEG or PDF, up to 100 KB)
Address proof of your business place (see the table below)
Bank proof, such as a cancelled cheque, passbook or statement
Active mobile number and email address for OTPs
Most individuals sign with the Aadhaar-based e-Sign or EVC, so a Digital Signature Certificate is not required. If you work from home, you can use your residence as the principal place of business with the right proof.
How to Get GST Number for Business
For a partnership firm, LLP or company, the process is the same, but you provide details of every promoter, partner or director (up to 10 entries) and at least one authorised signatory. Keep these ready:
PAN of the business and PAN, Aadhaar and photographs of partners, directors or promoters
Proof of constitution: partnership deed for a firm, or certificate of incorporation for a company or LLP
DIN of directors (mandatory for private, public and unlimited companies)
Authorisation letter or board resolution appointing the authorised signatory, with the signatory’s photograph
Proof of the principal place of business
Bank account proof in the business name
Companies and LLPs must sign the application with a DSC. For partnership firms, EVC or e-Sign by the authorised signatory is available.
Proof of Business Address Accepted for GST Registration
Your address must be a physical address with the correct PIN code. A PO box is not accepted.
Premises type
What to upload
Owned
Property tax receipt, electricity bill or khata copy
Rented
Rent agreement plus one ownership document of the landlord, such as an electricity bill or property tax receipt
Consent (family member’s property)
Signed consent letter from the owner plus one ownership document
Premises belonging to a parent or relative count as “consent” premises, not as your own. Co-working spaces need the membership agreement showing your allotted space, plus proof that the provider owns or leases the building.
How Many Days to Get a GST Number?
It takes about 3 to 7 working days for most applicants once the application is complete, and up to 30 days if your application is flagged for physical verification. The exact time depends on which route you are on.
Stage or route
Time taken
TRN
Instant after OTP verification
ARN
Right after Aadhaar authentication and signing (acknowledgement within about 15 minutes)
Simplified registration (Rule 14A)
Automatic approval within 3 working days of applying
Regular registration with Aadhaar authentication
Officer to act within 7 working days
No Aadhaar authentication, or premises flagged for verification
Up to 30 days
How Many Days to Get a GST Number After ARN?
After you receive your ARN, the wait is normally 3 working days on the simplified route and up to 7 working days on the regular route with Aadhaar authentication. If the officer is not satisfied, they can raise a query in Form GST REG-03. You then have 7 working days to reply, and the officer has another 7 working days to decide. If the officer does not act within the permitted time, the registration is treated as approved and the certificate is made available on the portal.
Simplified registration (Rule 14A) is open to small taxpayers whose output tax liability on supplies to registered persons does not exceed ₹2.5 lakh a month. It needs Aadhaar authentication and allows only one such registration per PAN in a state or union territory.
What slows the process down:
Not completing Aadhaar authentication or biometric verification within 15 days
If you want your documents checked before you submit, Cotaxo’s GST registration experts can review them for you.
Frequently Asked Questions
How to get a GST number?
Apply online at gst.gov.in under Services, Registration, New Registration. Complete Part A to get a TRN, fill Part B with business details and documents, complete Aadhaar authentication, and sign with DSC, e-Sign or EVC. You get an ARN on submission and the GSTIN after approval.
Is getting a GST number free?
Yes. The government charges no fee to get a GST number, so you can apply online for free on the official GST portal (gst.gov.in). Consultants may charge their own service fee, but you don’t need one to apply. A Digital Signature Certificate is needed only for companies and LLPs and costs extra.
Who is eligible to get a GST number?
You must get a GST number if your annual turnover crosses ₹40 lakh for goods or ₹20 lakh for services in most states. The limits are lower in some special category states. Registration is compulsory regardless of turnover for inter-state supply of goods, selling through e-commerce platforms (subject to exemptions), casual taxable persons and non-resident taxable persons. Other businesses can opt for voluntary registration. A PAN is mandatory for everyone.
How to get a GST number for proprietorship?
A sole proprietor applies using the proprietor’s PAN, Aadhaar, a photograph, business address proof and bank proof. You sign the application with e-Sign or EVC, so a DSC is not required, and complete Aadhaar authentication. The GSTIN is issued under the proprietor’s PAN after approval, usually within 3 to 7 working days.
What are the new GST registration fees?
The government fee for new GST registration is nil. You pay nothing to the GST portal at any stage of the application. The only possible costs are optional professional fees if you hire a consultant and the price of a DSC if you are a company or LLP.
Conclusion
Getting a GST number is a free online process: verify your details to get a TRN, complete the application, finish Aadhaar authentication, and sign to receive your ARN. Approval usually follows within 3 to 7 working days, and longer only if a query or physical verification is raised. Once you have your GSTIN, add your bank account details and start filing your GST returns on time. If you need help with monthly or quarterly filing, see Cotaxo’s GST return filing service.
FCS Yogesh Kumar is an experienced Company Secretary and corporate law professional with expertise in Corporate Law, Company Secretarial Practices, FEMA Regulations, Stamp Duty Matters, Corporate Governance, and Statutory Compliance.
He possesses practical knowledge of corporate legal frameworks, regulatory requirements, and business compliance procedures in India. His areas of expertise include Private Limited Company Registration, LLP Incorporation, MCA & ROC Compliance, Annual Filings, and Corporate Regulatory Matters.
With a solution-oriented approach, he focuses on simplifying complex legal and compliance requirements, providing valuable insights to entrepreneurs, startups, and business owners. His professional knowledge helps readers better understand corporate regulations, statutory obligations, and compliance best practices in India.
Submit your Details to get an Instant All-inclusive Quote and a FREE Expert consultation